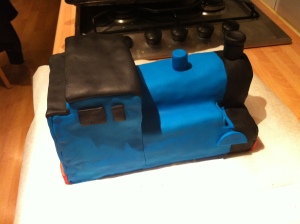
Creating a Thomas the Tank Engine cake for a young friend’s birthday party was my latest cake challenge. Fortunately, I found a lot of help on the internet, and it seems that Thomas the Tank Engine birthday cakes are a popular choice for the young man about town. I used a chocolate fudge cake recipe with vanilla butter cream frosting. Here’s how it turned out:
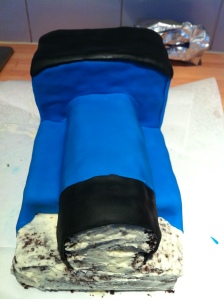
So here’s how Thomas was made. The cake is the chocolate fudge cake that I use for, well, pretty much everything – and the recipe is here. I used one and a half times the recipe, baking two square cakes in 11×11 inch tins. There is a fair bit of carving involved with Thomas, and a layer of crumbing frosting is essential. This layer is to prevent lots of crumbs spoiling the fondant finishing. You can see the evolution of the shape of the cake in the photos below – two square cakes, cut in half and sandwiched together with layers of yummy vanilla butter cream frosting.
Luckily you can see I had a Thomas toy to model for me! Carving the rounded front end is really the only slightly difficult part, as you can see the rest of the carving are just straight cuts. Here’s how the front turned out, and how Thomas looks after being crumbed.
After this was done, things got serious. I has coloured the fondant I was using already with gel colourings, but the nerves kicked in, so I went browsing for some online assistance. I found this amazing Thomas the Tank Engine cake tutorial (why, oh why didn’t I do this before carving) which outlines both how to construct the cake, and how to make Thomas’ face. Thanks to Wendy for this and you can find her tutorial here. The tutorial is particularly good on how to make the face, and a good tip too to freeze the cake to make it easier to carve, something I didn’t do. Gradually I built up the layers of fondant, and slowly the whole thing started to look right.
I think he looks a bit creepy with no face, so I put the face on next and finished with all the red and yellow bits. You might notice that he isn’t quite anatomically correct, but enough so that I could live with it.
OK – an aside – I am in the process of ordering some cake modelling tools, so I promise in future that some of those sloppy joins will disappear! But I am certainly getting better with the fondant. Perhaps I could have taken a little more care with the carving – he certainly has a lean, maybe he’s just taking a sharp corner?


Wow! I’ll be taking your documented process as guide to make my sons cake. Thanks for putting such detailed pix on your blog 🙂
Thanks for the link for the other titurial but I like yours 100 times more, easier and looking a lot nicer, thanks
Did you put several layers of fondant over each other? You said you built up the layers of fondant, so i’m assuming that’s what you made? And what was the name of the color you used for the blue? Thanks!!
Hi sue! I can’t remember the name of the blue, but it was a gel colourant. Yes, the detail was built up using layers of fondant. Thanks!
Thanks for the helpful pics and info (links) I will follow your guide and attempt this for my young man about towns birthday – idea: change Thomas’ number to that of the birthday boy/girl/person :))
Thank heaven for serious bloggers like you x
Thanks! That’s a great idea about changing the number!
Pingback: My Week; Practice Train Cake & Training | Fozia Saeed
Hi there i was just wondering how you stacked the cake. i cant tell in the pictures what you have done with the two cakes
Hi David, I just cut down the cakes into rectangles and sandwiched together with butter cream frosting!
Hi! Great cake. Just wondering how you made the smoke stack?
Hi Erin, the smokestack is just moulded out of fondant.
I’ve just made this for my son’s 3rd birthday. I can send you a photo of it if you like. Thanks for sharing it , the kids loved it.
Fantastic! Please do post a photo!
[URL=http://s676.photobucket.com/user/peanutsmum_photos/media/imagejpg1_zpsb370ba8f.jpg.html]
That didn’t appear as I meant it to at all. I will try to sort it out.
http://s676.photobucket.com/user/peanutsmum_photos/media/imagejpg1_zpsb370ba8f.jpg.html?src=pb
I don’t know how to get it to post a photo but this link will take you to the pic.
HI, this is amazing! So amazing! It is1AM in Sydney and I am preparing the same cake for my son in a couple of days. Made the face, but now has some cracks! Not sure if I can make it again before the party.The other tutorial said to make the face 7 days prior to the party. Anyway, not sure how often you check your messages, but I am sort of panicking.
Uh oh! You could try remoulding over the cracks with damp fingers? Let me know how things go, and good luck!
will try
with fingers! and will let you know! thanks Karina!
nice cake so easy to make 😀
Very nice and uncomplicated. Made one last week for a friend’s son’s 3rd Birthday. Everyone loved it. Thanks for the inspiration.